Wednesday, February 12, 2014

NEW BLOG! Out with the old, In with the new


The time has come to make some changes. Seeing as I’m no longer doing business under the “Spot of Colour” name, and that I’ve become a bit fed up with using Blogger, I’ve decided to relocate my blog to http://madebyrach.wordpress.com/. I’m already much more impressed with the aesthetics of it, and I’m going to make a big effort to not leave huge gaps between posts as I have been doing lately.

So if you’ve been following me, then please keep following me over at the new place!

Tuesday, August 20, 2013

Polka Dot Skirt Goodness

My blog has been a little sad and lonely for a little while, but I have good reason. After quite a while, I now have an ongoing, full-time job. The obvious plus is that I now have extra money - which means I can actually afford to do a few more of my sewing projects that I've been wanting to do, the downside is that I don't have anywhere near as much time to sew anymore. I will keep going though, and will continue to share whatever projects I manage to complete, so please keep checking back.

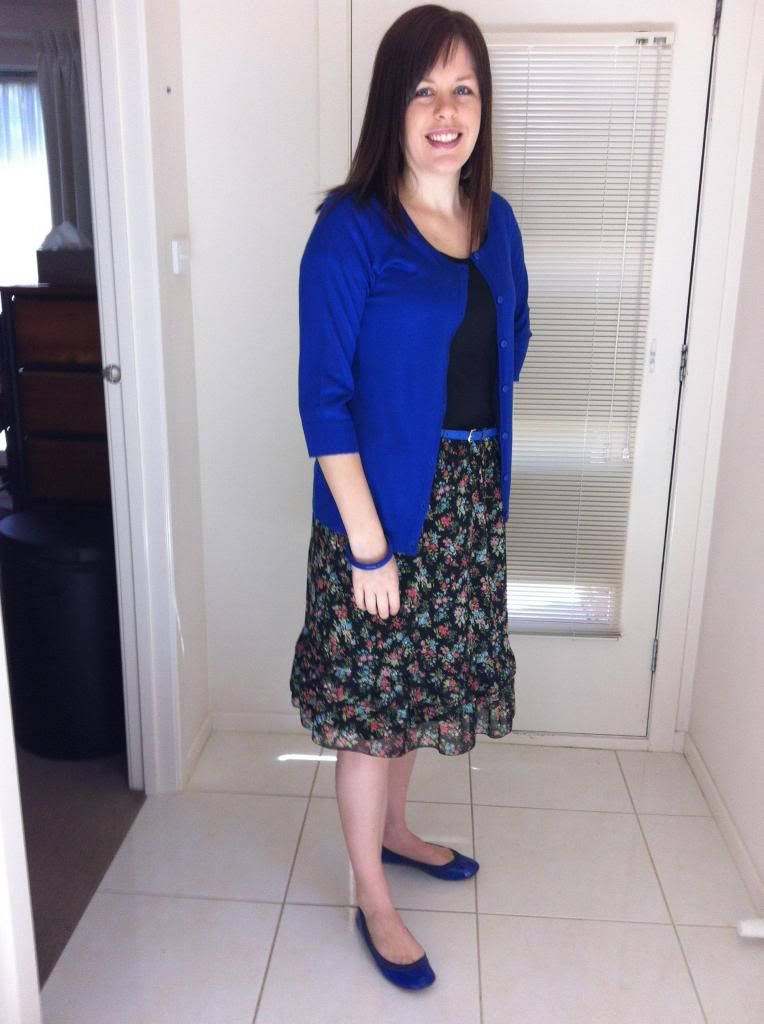
Onto more exciting things - my wonderful new skirt that I made!

I stumbled across some polka dot material in my local Spotlight store a few months ago and I knew I just had to have it (for anyone that has been observing my fashion style lately, you'll know that I'm becoming a sucker for anything with polka dots!). So while I was in Spotlight, I decided I would look for a pattern to suit what I envisioned for the polka dots in my head. As luck would have it, I came across something perfect (how often does that happen??) and, even luckier, it was on special. Brilliant!


I used Butterick's B5613 Misses Skirt and Sash Pattern, using the version C skirt, but adding pockets (from version A) and also added lining. I'm usually an Australian size 12 and my measurements fitted within the size 18 of the pattern; I hesitated with this at first but went ahead with the size 18, half expecting to have to alter it. It fit perfectly! As in, I don't think I own a store bought skirt that fits me as well as this one, and it is really very flattering.

I very much recommend this pattern, though don't be too fooled by the "fast and easy" description on the pattern front. Though I had no problems with it, you will need to be able to sew pleats, a zipper, and some handsewing, so I wouldn't recommend this for a beginner unless you'll be receiving some guidance from someone more experienced.

Thursday, February 28, 2013

Denim Skirt Craziness

In a recent post, I mentioned that I had made a couple of denim skirts at the end of last year. I finally got around to getting some photos of them last night, so now it's time to share!


I actually planned to make two denim skirts from the start, just one a bit "fancier" than the other. I drafted my own pattern from an existing denim skirt that I own - I've actually used this skirt as a pattern previously for a couple of other skirts, so this time I made up some proper pattern pieces so that it makes it a lot easier in the future.

This skirt is just a simple A-line skirt, with a zipper fastening at the back, but I love it and can wear it with so much. The only problem that I discovered afterwards is that it's really bad for static - it clings and bunches something shocking if I'm wearing tights or leggings underneath - so I really should have lined it.


I was inspired by Feelin Crafty's Backgammon Skirt Tutorial to make this. The tutorial was for a child's skirt, so I just used my existing skirt pattern and used her pattern pieces for the triangles. I learnt a huge lesson with this one: it's very important to cut out your pieces accurately! I cut out most of these triangle pieces while watching a movie, and I must have been distracted because when I sewed them all together, it looked shocking. I had to unpick it all and trim the triangle pieces down to the exact right shape, and then started over again. It was worth it, but boy was I glad to be finished this one.

I did learn from my previous skirt though, and lined the border with anti-static lining - success! No bunching or clinginess from this skirt, so I think this will be my winter denim skirt that I wear with thick tights/leggings and boots. And in Melbourne, that usually becomes my staple outfit for at least 6 months of the year.

Monday, February 25, 2013

Madeleine Bag


I'm really excited to share this project with you!

I made this bag for my Mum's birthday and I actually really enjoyed making it, and it turned out perfectly. I used Imagine Gnat's Madeleine Bag Tutorial, which included not only free printable pattern pieces, but really easy to follow instructions. I'd never inserted a magnetic closure, or a zipper pocket, but I breezed through both stages with her amazing mini tutorials.


I used Joel Dewberry's Aviary Fabric in the purple and green. Imagine Gnat actually uses Aviary fabric in her tutorial as well, and I loved it so much that I thought I would go with something similar. I'm so glad I did.

Mum loved it, which made it all worthwhile!


I already have some fabric ordered to make myself one (yes, I loved making it that much!) so keep a lookout for a Madeleine Bag 2.0.

Sunday, February 17, 2013

Fun Auntie Stuff!

I love being an Auntie. I have 5 nephews, and 4 nieces who I just adore.

One of my brothers lives overseas with his wife and two children, and recently my Sister in Law took a trip out to Australia with the kids. I discovered that they were in need of some new clothes so I eagerly raided my fabric stash and whipped up some clothes for them!


These pajama shorts are for my gorgeous nephew. I was lucky enough to have just enough of this Robot fabric in my stash. I made these using this Pajama Pants Tutorial and a pair of another one of my nephew's old pajama pants as a template.


This is just a simple jersey knit skirt with a stretchy waistband, and a cord tie on the inside to make it a bit more adjustable.


This is my favourite! I had *just* enough denim fabric leftover from my denim skirts that I'd made (yet to be blogged about - sorry) to make this skirt. It has an adjustable waist, and the flower applique I bought from my local Spotlight store and was a simple iron on motif.

So it just goes to show how much can be made with just those fabric remnants you've been hanging onto, doesn't it.

Wednesday, February 13, 2013

Child's Paint Smock

A good friend of mine asked me if I could make her little son a paint smock for when he started school this year. She wanted it to be something fun that he would recognise and love, and also it needed to have his name clearly labelled where the teachers could easily see it.

I set about finding a free pattern for an ideal paint smock, and found this Kid's Art Smock Pattern from Don't Look Now!'s Blog. It not only has a free pattern, but a step-by-step tutorial that is very easy to follow.


The fabric that I used was Robert Kaufman's Robot Factory - this was the one that Master T picked from some of my favourites, and I'm glad he did as I just love it!

And lastly, my husband (Graphic Designer/Signwriter) came up with the idea of printing the name onto iron-on vinyl. I don't think his teacher will have any trouble seeing that!

Friday, January 18, 2013

Upcycled Dress

I've had a tunic dress/top for a few years that was always a favourite of mine to wear with jeans. Lately though it hasn't been fitting well, but I didn't want to part with it so kept it aside until I figured out what to do with it.

I decided to cut the top part - from just below the bust - and to use a black tee to make it into a knee length dress. Here it is (sorry, I didn't take a before photo of the top in it's original form):


And with a cardi:


I also lined the skirt part as it was see through, and it actually makes it sit even better with the extra weight. It's so comfortable, and I'm happy with how it worked out. I had been a bit concerned that it wouldn't have much shape to it, but I think it looks fine. I love the fact that I can just switch the belt and accessories to give it a completely different look too.

Success!